How To
5 ways to manage your security with Windows Defender
- May 25, 2022
- Updated: July 2, 2025 at 3:43 AM
Windows Defender is Windows’ built-in protection against viruses, malware, and other cyber attacks on your PC or laptop. In 2020, it was renamed Microsoft Defender in updates to most Windows versions.
By default, Defender starts whenever you run Windows and silently checks for suspicious activity in real-time, taking action when necessary. The app comes with plenty of customization options that you can use in case of specific attacks, conflicts, crashes, or other situations. Here are five of the most useful settings you can customize.
Enable or disable Windows Defender
You can turn Windows Defender on or off whenever you need to. This can come in handy if you want to disable its antivirus to install a program, play a game without an automatic scan slowing down your system, or troubleshoot a false positive for an app you know is safe.
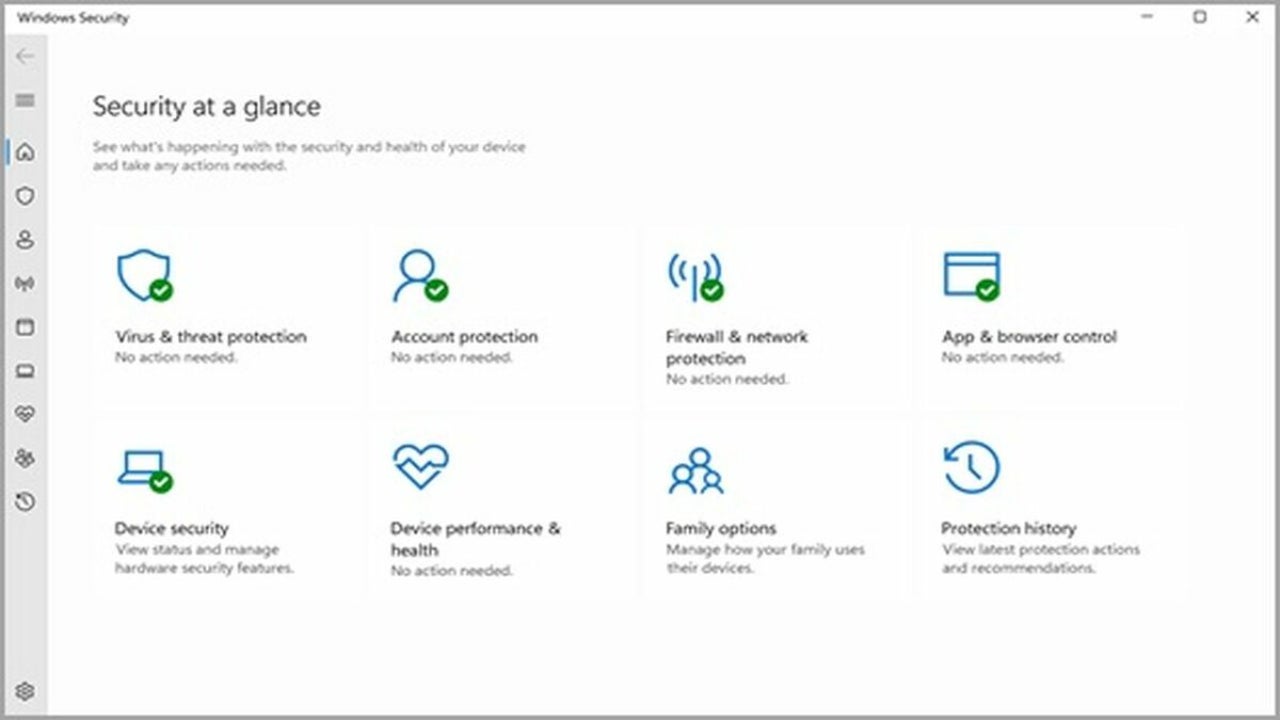
You can find Windows Defender’s main menu by clicking on your Start menu and going to Settings > Update & Security > Windows Security. In the Windows Security window, click on Virus & threat protection in the sidebar on the left. Scroll down until you see the heading labeled Virus & threat protection settings, and click on Manage settings.
Toggle the On/Off button under the Real-time protection heading to activate your protection if Windows Defender is turned off or deactivate it if its already running. Unless you have a separate antivirus program installed, this button will automatically reset to the On position the next time you reboot your device.

Exclude specific files, folders, or extensions
Windows Defender also lets you exclude individual files, folders, or file types from being scanned so you can troubleshoot without turning off all your protection. Here’s how to whitelist a file, folder, extension, or process if you’re sure it comes from a trusted source with no harmful embedded scripts.
In the same Manage settings section of the Virus & threat protection window mentioned above, scroll down until you see the Exclusions section. Click Add an exclusion.
Click on the type of item you want to exclude and Defender will open a file explorer so you can select the individual item:
- File will let you exclude a single file.
- Folder will let you exclude an entire folder.
- File type will let you exclude any file ending in a given extension, like ZIP or EXE.
- Process will let you exclude any files opened by the process you select, although Defender will still scan the process itself.

Use the right scan for the job
To scan your computer for viruses and malware on demand, go back to the Virus & threat protection window. Under the Current Threats section, click on Scan Options.
Windows Defender gives you four types of scans:
- Quick scan runs a brief checkup of your computer’s most vulnerable areas, including the Windows folders and registry.
- Full scan performs a sequential examination of all your computer’s files and active programs. This may take hours to finish.
- Custom scan lets you select individual files, folders, or hard drives to check.
- Offline scan will reboot your device and perform a full scan before loading Windows. This can be useful to find malware like boot sector viruses that bypass Windows.
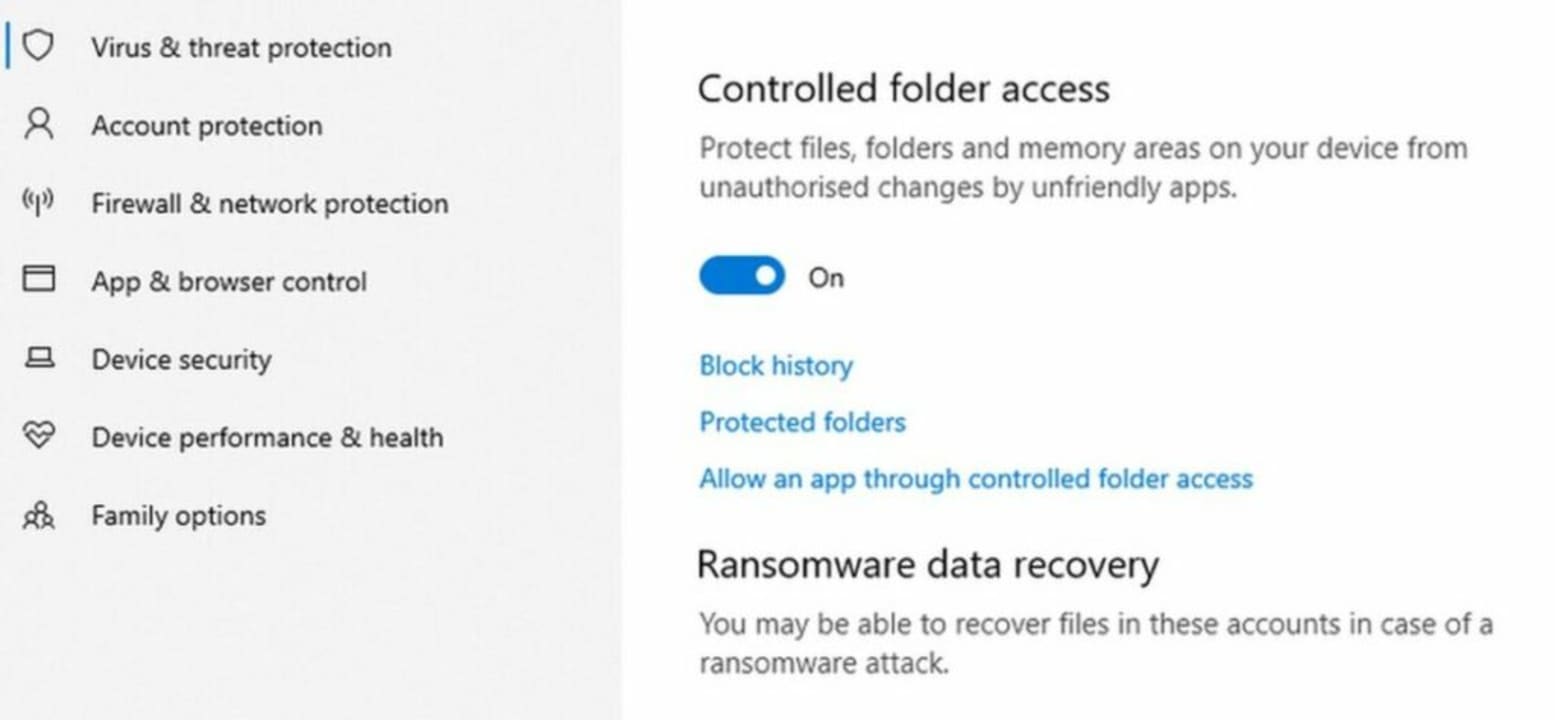
Keep your files safe from ransomware
Ransomware is a relatively new kind of attack that encrypts your data until you pay the attacker for the decryption key. By default, Defender’s ransomware protection is toggled off to avoid blocking legitimate file access.
To turn it on, return to the Virus & threat protection screen, and scroll down to the heading labeled Ransomware protection. Click Manage ransomware protection.
This is where you can control access to your most valuable folders. Turning on the toggle switch under the Controlled folder access heading will prevent access to your Desktop, Documents, Pictures, Music, and Videos folders. If you want to add more folders, click Protected folders > Add a protected folder.
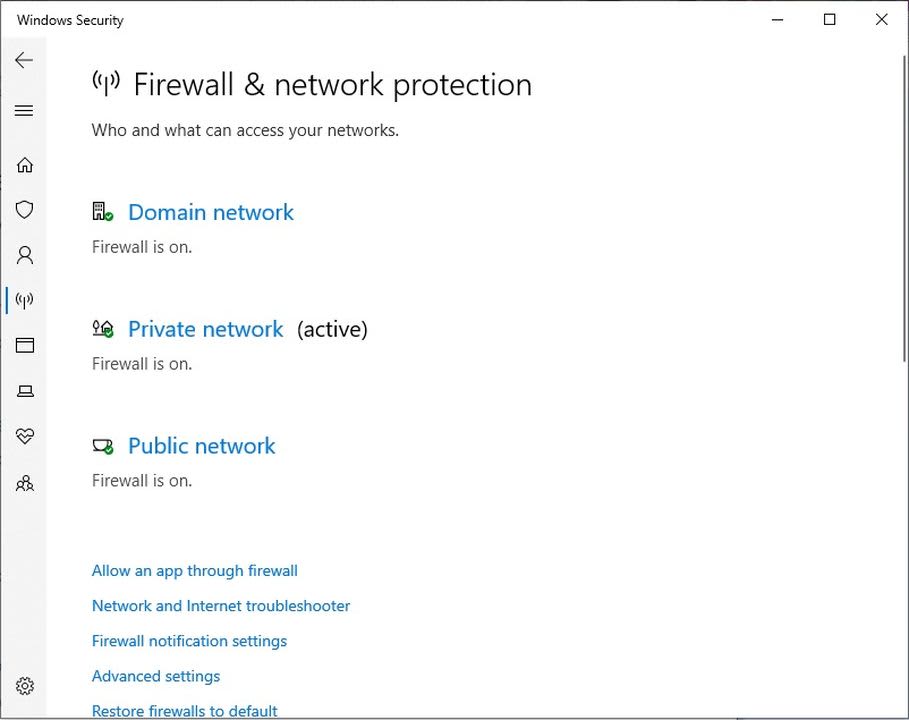
Protect yourself from an active attack with Shields Up mode
If you notice suspicious activity on your network or want to guard your device from an unsecured network while traveling, you can turn on Shields Up mode in your Windows Defender firewall.
Under Windows Security > Firewall & network protection, you should see three types of networks, Domain network, Private network, and Public network. Click on each type of network, one at a time, and find its box labeled Blocks all incoming connections, including those in the list of allowed apps.
You’ll see a box with that same label in the individual window for each type of network. Check all three boxes to enable Shields Up mode and block all incoming connections. If you want to get online again, revisit each network window and uncheck each individual box.
Use Windows Defender to customize your security to your situation
Defender’s default options will work for most typical situations, but it’s useful to know how to customize a few basic settings in case of an emergency.
If you need stronger protection, you can install a separate antivirus or firewall program with more features and options. Check out our list of the top 10 antivirus solutions.

You may also like
 News
NewsCapcom claims that it wants to bring back three of its flagship franchises
Read more
 News
NewsThe actor of Draco Malfoy premieres what, at the last moment, is on its way to becoming the worst movie of the year
Read more
 News
NewsIf Red Dead Redemption had a television adaptation, there is already an actor willing to play Arthur Morgan… and for free
Read more
 News
NewsHow are the nominees and winners of the Game Awards chosen? We explain it to you
Read more
 News
NewsHelldivers 2 is getting ready to receive its biggest update to date
Read more
 News
NewsThe creator of Doom confirms that he has managed to avoid the cancellation of his new video game
Read more